


はじめに
APIドキュメントをエクセルで作成しているんだけど、
もっといい方法ないかな??
swaggerを導入するとAPIドキュメントを自動作成できるよ!
うさぎが学習しているSpring Bootへの導入方法を見ていこう!
依存関係の記述
build.gradleに以下を記述します。
dependencies {
	implementation "io.springfox:springfox-swagger2:2.6.1"
	implementation "io.springfox:springfox-swagger-ui:2.6.1"
}
mavenの場合は、pom.xmlに下記を追加してください。
<dependency>
    <groupId>io.springfox</groupId>
    <artifactId>springfox-swagger2</artifactId>
    <version>2.6.1</version>
</dependency>
<dependency>
    <groupId>io.springfox</groupId>
    <artifactId>springfox-swagger-ui</artifactId>
    <version>2.6.1</version>
</dependency>
バージョンは下記のサイトに記載があるので、必要に応じて書き換えてください。
https://mvnrepository.com/artifact/io.springfox/springfox-swagger2
https://mvnrepository.com/artifact/io.springfox/springfox-swagger-ui
Configファイルの作成
package com.example.apipractice.config;

import org.springframework.context.annotation.Bean;
import org.springframework.context.annotation.Configuration;
import springfox.documentation.builders.ApiInfoBuilder;
import springfox.documentation.builders.PathSelectors;
import springfox.documentation.builders.RequestHandlerSelectors;
import springfox.documentation.service.ApiInfo;
import springfox.documentation.spi.DocumentationType;
import springfox.documentation.spring.web.plugins.Docket;
import springfox.documentation.swagger2.annotations.EnableSwagger2;

@Configuration
@EnableSwagger2
public class SwaggerConf {

    @Bean
    public Docket document() {
        return new Docket(DocumentationType.SWAGGER_2)
                .select() //ApiSelectorBuilderの生成
                // controllerクラスが格納されたパッケージを指定
                .apis(RequestHandlerSelectors.basePackage("com.example.apipractice.controller"))
                // 使用するAPIのパスを設定できる
                .paths(PathSelectors.any())
                .build()
                // getApiInfo()の情報を格納する
                .apiInfo(getApiInfo());

    }

    // APIに関する情報を生成する(なくても問題ない。)
    private ApiInfo getApiInfo(){
        return new ApiInfoBuilder()
                // APIのタイトル
                .title("sample-api")
                // APIの説明
                .description("REST APIのサンプルプログラムです。")
                // APIのバージョン
                .version("1.0.0")
                .build();
    }
}
赤字のアノテーションをクラスに付与することでSwagger UIの全体に関わる設定クラスとすることができます。
Controllerクラスへの追記(必要に応じて)
赤字の箇所が今回のポイントとなる箇所です。今回はGETメソッドのみ記載しています。
各APIやレスポンス、パラメータに説明文を付与することができます。
@RestController
@RequestMapping("/api-sample")
public class ApiSampleController {
@Autowired
ApiSampleService apiSampleService;
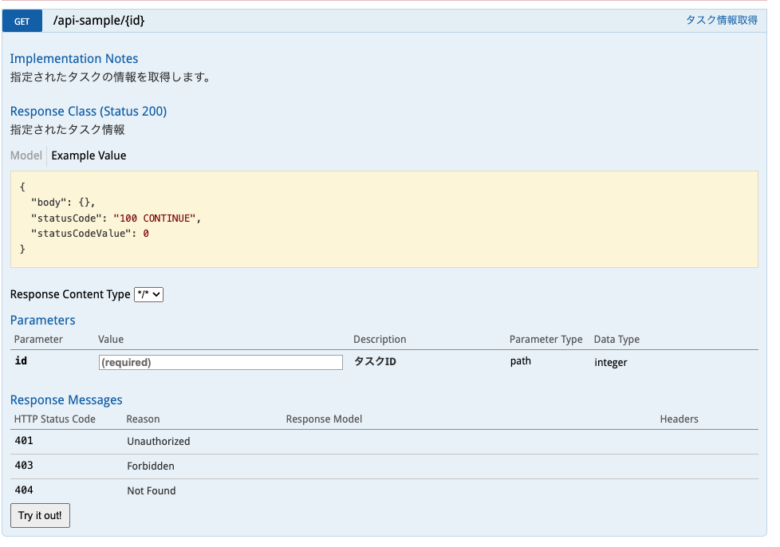
@ApiOperation(value = "タスク情報取得",notes = "指定されたタスクの情報を取得します。")
@ApiResponses(value = {@ApiResponse(code = 200,message = "指定されたタスク情報",response = ResponseEntity.class)})
@GetMapping("/{id}")
public ResponseEntity<ApiSampleModel> searchTopicById(@ApiParam(value = "タスクID",required = true) @PathVariable Integer id){
ApiSampleModel model= apiSampleService.findById(id);
if(null == model){
throw new NotFoundException(id);
}
return ResponseEntity.ok(model);
}
@PostMapping("/createTopic")
public ResponseEntity<ApiSampleModel> createTopic(@RequestBody ApiSampleForm form){
if(!formCheck(form)){
throw new BatRequestException(form);
}
ApiSampleModel model = apiSampleService.addTopic(form.getTitle(),form.getContent());
return ResponseEntity.status(HttpStatus.CREATED).body(model);
}
@PutMapping("/{id}")
public ResponseEntity<ApiSampleModel> editTopic(@PathVariable Integer id,@RequestBody ApiSampleForm form){
ApiSampleModel model = apiSampleService.updateTopic(id,form.getTitle(), form.getContent());
return ResponseEntity.ok(model);
}
@DeleteMapping("/{id}")
public ResponseEntity<Void> deleteTopic(@PathVariable Integer id){
ApiSampleModel model = apiSampleService.deleteTopic(id);
return ResponseEntity.status(HttpStatus.NO_CONTENT).build();
}
private Boolean formCheck(ApiSampleForm form){
if(null == form.getTitle() || null == form.getContent()){
return false;
}
if("".equals(form.getTitle()) || "".equals(form.getContent())){
return false;
}
return true;
}
}ちなみに、このコントローラークラスはこちらの記事で詳しく解説しています。
気になる方は是非、併せてご覧ください。
-1-160x90.jpg)
ドキュメントの生成・確認
起動して、以下にアクセスします。
http://localhost:8080/swagger-ui.html以下のようにドキュメントが表示されれば成功です。
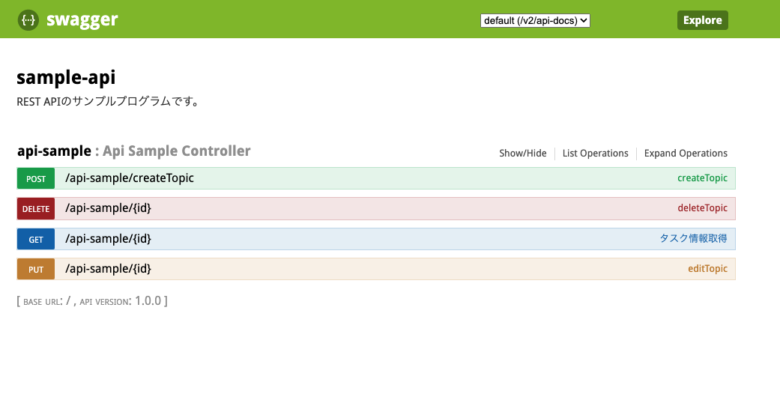
GETメソッドのタブを開くと、Controllerクラスに記載した情報が記載されていることが確認できました。
補足
私の環境では、ビルド時にエラーが下記のエラーが起こりました。
org.springframework.context.ApplicationContextException: Failed to start bean 'documentationPluginsBootstrapper'; nested exception is java.lang.NullPointerExceptionapplication.ymlに以下を記述することで解消されました。
spring:
  mvc:
    pathmatch:
      matching-strategy: ant_path_matcher
propatiesの場合は下記の通りです。
spring.mvc.pathmatch.matching-strategy = ANT_PATH_MATCHER参考
https://qiita.com/disc99/items/37228f5d687ad2969aa2
https://qiita.com/nooboolean/items/ee794ec4b30d9e93bf9f
https://stackoverflow.com/questions/70059018/swagger-2-issue-spring-boot
終わりに
本記事はここまでとなります。ご覧いただきありがとうございました。
ご指摘等がございましたら頂けますと嬉しいです。
引き続き、プログラミングについて定期的に発信していきますのでよろしくお願いします!
また、もしよろしければtwitterもフォローしていただけると嬉しいです。
コメント