-1.jpg)


はじめに
最近、Spirng Bootを勉強し始めたぞ!
APIってよく聞くけど、どうやって作るんだろう?
バックエンドエンジニアなら、APIの開発知識は
必須だよ!今回はサンプルコードを使用して
簡単なAPIを作成していくよ!
作成するサンプルAPIについて
今回は下記のtopicsテーブルのデータを取得(GET)、追加(POST)、更新(PUT)、削除(DELETE)する機能をもつAPIを作成していきます。
APIの動作確認には、無料で手軽に検証できるPostmanを使用していきます。現場でも比較的、よく使われるので、使用したことがない方は一度使用してみることをおすすめします。
| id | title | content |
| 1 | title1 | cntent1 |
| 2 | title2 | cntent2 |
| 3 | title3 | cntent3 |
| 4 | title4 | cntent4 |
| 5 | title5 | cntent5 |
| 6 | title6 | cntent6 |
作成手順概要
大まかな手順は以下の通りです。本記事は2記事に分かれており、本記事(2編)では下記、赤字部分が対象となります。
また、プロジェクトの作成やMySQL導入等の環境面については省略させていただきます。
- 環境の確認、設定ファイルの作成
- テーブルの作成、データの投入
- Modelの作成
- Controllerの作成
- Serviceの作成
- Repository(Mapper)の作成
- 動作確認
第1編は下記よりご確認ください。
-1-160x90.jpg)
Serviceの作成
業務処理を行うサービスクラスは以下の通りです。
基本的にはRepositoryから取得したtopicをモデルに入れて、コントローラーに渡しているのみとなります。
@Service
@RequiredArgsConstructor
public class ApiSampleService {

    private final ApiSampleRepository apiSampleRepository;

    public ApiSampleModel findById(Integer id){
        return apiSampleRepository.findById(id);
    }

    public ApiSampleModel addTopic(String title,String content){
        ApiSampleModel model = new ApiSampleModel(title,content);
        apiSampleRepository.insertTopic(model);
        return model;
    }

    public ApiSampleModel updateTopic(Integer id,String title,String content){
        ApiSampleModel model = new ApiSampleModel(id,title,content);
        apiSampleRepository.updateTopic(model);
        return model;
    }

    public ApiSampleModel deleteTopic(Integer id){
        apiSampleRepository.deleteTopic(id);
        return findById(id);
    }

}
Repository(Mapper)の作成
Repository(Mapper)は以下の通りです。Mybatisを使用する関係で、@Mapperアノテーションを付与し、interfaceとしています。赤字のメソッド名と以降に記載するxmlファイルのidを紐づけます。
詳しい解説は下記の記事に記載していますので、必要に応じて参照ください。

@Mapper
public interface ApiSampleRepository {

    ApiSampleModel findById(Integer id);

    void insertTopic(ApiSampleModel model);

    void updateTopic(ApiSampleModel model);

    void deleteTopic(Integer id);
}
sqlを記載するxmlファイルは以下の通りです。
<?xml version="1.0" encoding="UTF-8" ?>
<!DOCTYPE mapper PUBLIC "-//mybatis.org//DTD Mapper 3.0//EN" "http://mybatis.org/dtd/mybatis-3-mapper.dtd">
<mapper namespace="com.example.apipractice.repository.ApiSampleRepository">

    <resultMap id="Api_Sample_Result_Map" type="com.example.apipractice.model.ApiSampleModel">
        <id column="id" property="id" jdbcType="INTEGER"/>
        <result column="title" property="title" jdbcType="VARCHAR"/>
        <result column="content" property="content" jdbcType="VARCHAR"/>
    </resultMap>

    <select id="findById" parameterType="int" resultMap="Api_Sample_Result_Map">
        select
        id, title, content
        from topics where id = #{id}
    </select>
    <insert id="insertTopic" useGeneratedKeys="true"
            keyProperty="id">
        insert into topics (title,content)
        values (#{title},#{content})
    </insert>
    <update id="updateTopic">
        update topics set
        title = #{title},
        content = #{content}
        where id = #{id}
    </update>
    <delete id="deleteTopic">
        delete from topics
        where id = #{id}
    </delete>
</mapper>
動作確認
ローカルでアプリケーションを起動してリPostmanでリクエストを投げます。
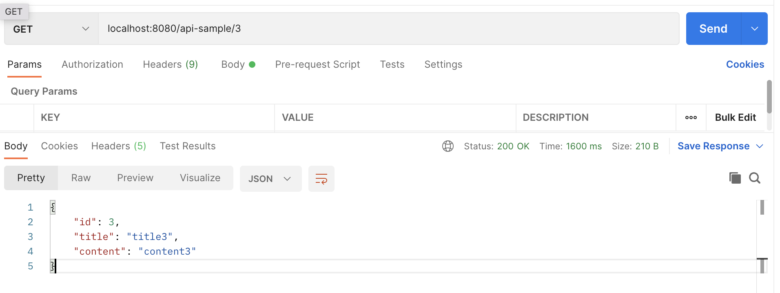
GET
localhost:8080/api-sample/3(GET)で送るとid3のトピックが取得できていることが分かります。
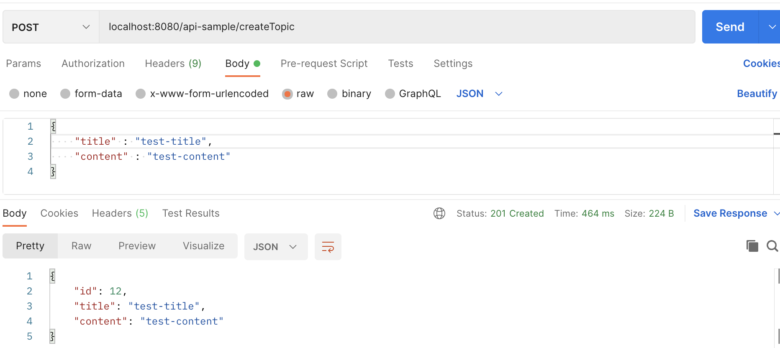
POST
localhost:8080/api-sample/createTopic(POST)で送ると、新しいトピックが作成されます。
リクエストボディには登録したいtitle,contentをjson形式で記載します。
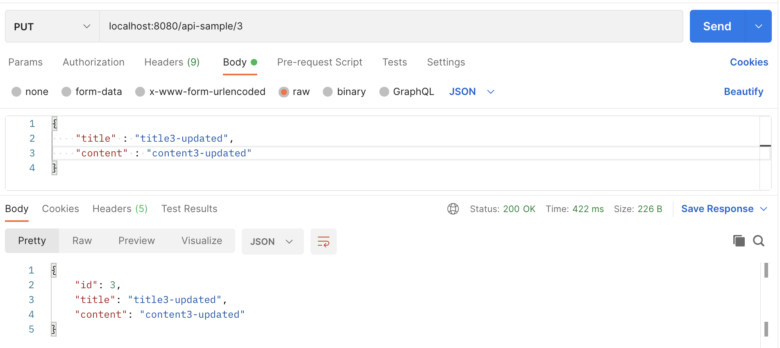
PUT
localhost:8080/api-sample/3(PUT)で送るとid3のトピックが更新できていることが分かります。
リクエストボディには更新後のtitle,contentをjson形式で記載します。
DELETE
localhost:8080/api-sample/3(DELETE)で送るとid3のトピックが削除されます。
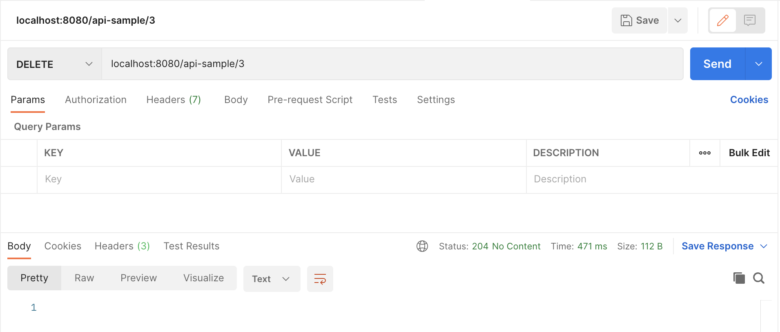
DBで削除されていることを確認。
終わりに
本記事はここまでとなります。第1編も是非併せてご確認ください。
ご覧いただきありがとうございました。ご指摘等がございましたら頂けますと嬉しいです。
引き続き、プログラミングについて定期的に発信していきますのでよろしくお願いします!
また、もしよろしければtwitterもフォローしていただけると嬉しいです!🐢
コメント